Welcome to our comprehensive DIY guide on the 3SGE Beams swap, where we will take you through all the important details and steps involved in this popular engine swap.
Whether you are a performance fan looking for an upgrade or a seasoned mechanic searching for reliable information on the topic, this article is designed to provide you with everything you need to know about the 3SGE Beams swap process.
Without fluff and straight to the point 👨🔧…
From understanding the origins and capabilities of the 3SGE Beams engine to exploring its compatibility with various vehicles, we leave no stone unturned in helping you make an informed decision.
The 3SGE Beams is an iconic high-revving engine produced by Toyota in the 1990s. Tuners and enthusiasts still seek out the engines today for their incredible power potential, affordability, and reliability as an engine swap.
Get comfortable as we explore all there is to know about the remarkable 3SGE beams swap.
Understanding the 3SGE Beams Engine: Origins and Capabilities
To fully appreciate the thrill of performing a 3SGE Beams swap, it helps to understand where this high-revving engine came from and its impressive performance potential.
The 3SGE Beams traces its roots back to Toyota’s S-series of DOHC 4-cylinder engines in the 1980s. The S-series established itself as an incredibly advanced, lightweight engine family at the time.
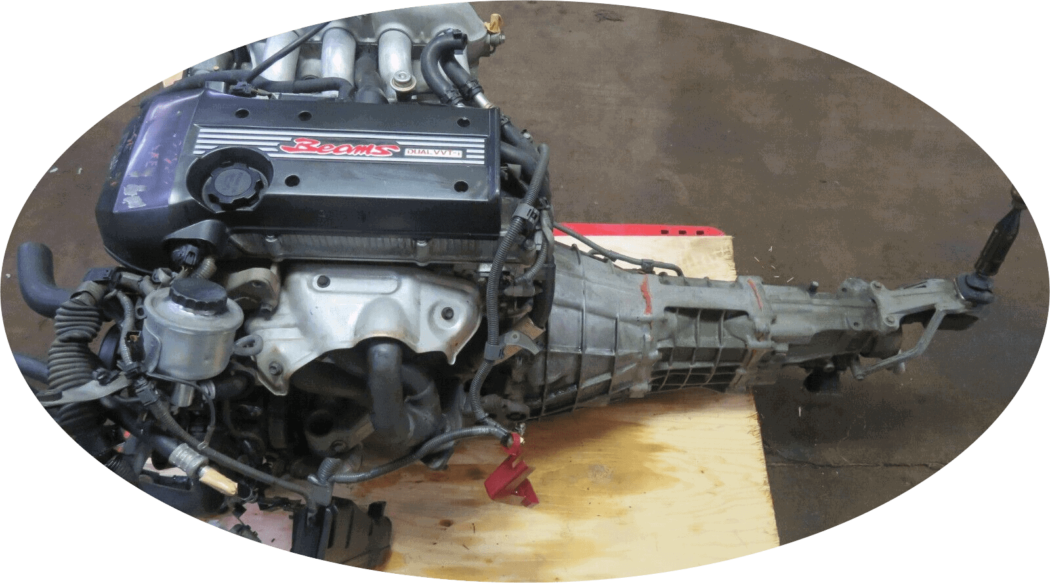
In 1991, Toyota introduced the first 3SGE Beams variation in the JDM Altezza RS200. The “Beams” designation indicated this high-output, high-tech version of the 3SGE intended for Toyota’s performance models.
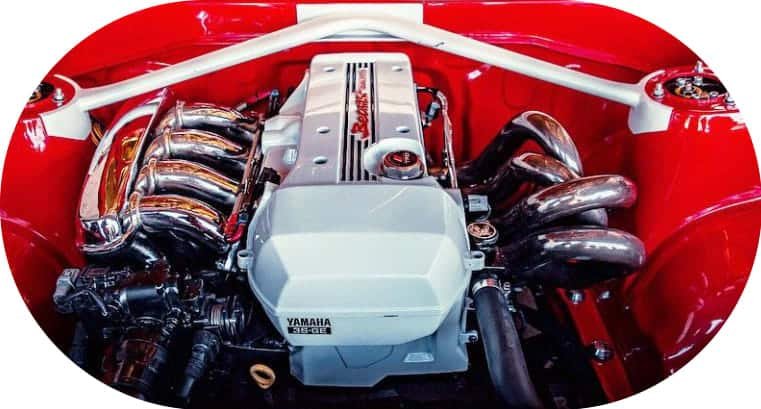
Image courtesy of LinkECU
The name “Beams” stands for Breakthrough Engine with Advanced Mechanism System, highlighting its innovative design and technology. True to its name, the engineers at Yamaha developed this engine to push the limits of 4-cylinder performance.
The Beams philosophy emphasizes,
– A high compression ratio,
– Aggressive cams,
– Reaching for maximum RPM.
This gave the engines an incredible appetite for revs and the ability to make big naturally aspirated power.
Over the years, Toyota continued refining the 3SGE Beams engine family. Notable models included the:
- Red-top Beams,
- Stroked 3S-GE Beams,
- The race-bred 280-hp 2JZ-GE Beams.
Let’s explore why these engines are so revered by performance enthusiasts even today.
3SGE Beams Engine Specs and Technology
The 3SGE Beams engine offers impressive performance capabilities. With its high-revving nature, it delivers a thrilling driving experience and generates excellent power output.
Here are some of the standout technical features that enable the 3SGE Beams to generate its famously high RPM power:
- DOHC Design – The dual overhead cams allow precise control of valve events for high RPM stability. The 4-valve aluminum cylinder head flows incredibly well.
- VVT-i – Toyota’s variable valve timing optimizes engine response across the entire rev range while improving emissions and fuel efficiency.
- 11:1 Compression – A high static compression ratio improves thermal efficiency and power. Requires premium fuel.
- Forged Steel Components – The crank, rods, and pistons are all strong forged pieces that can handle big boost pressures.
- Crossflow Head – Advanced airflow design allows straighter inlet ports for better cylinder filling.
- Electronic Throttle – Drive-by-wire electronic throttle provides much finer control over airflow compared to old-school cable throttle bodies.
These sophisticated engines achieved 160 to 250 hp in stock form depending on the exact variation. It’s safe to say the 3SGE’s immense tuning potential makes it a storied swap choice for performance tuners.
Performance Capabilities of the 3SGE Beams
Given the immense headroom of the 3SGE architecture, the Beams engines respond extremely well to modifications and boosts.
With simple bolts like intake, headers, camshafts, etc., the Beams can conservatively reach 220-240 WHP naturally aspirated. Adding forced induction like a turbo or supercharger unlocks effortless 300+ horsepower potential.
Just how high can the 3SGE Beams be pushed?
Some extreme builds exceed 500 WHP on a built bottom end and a huge boost. Power records have these engines making over 600 hp on the dyno in all-out race trim.
Equally impressive is the smooth high RPM power delivery. The VVT-i models hold peak power past 8,000 RPM before hitting the limiter around 8,500 RPM stock. When uncorked, the 3SGE thrives well beyond the 9,000 RPM range.
Whether you want to build a high-revving naturally aspirated monster or add forced induction for a big boost, the 3SGE Beams deliver incredible tuning headroom for your projects.
Compatibility And Selection For A 3SGE Beams Swap
A major part of planning your 3SGE Beams swap is choosing the optimal vehicle platform and engine variation to match your goals. Starting with the right car/motor set-up could save you lots of time, resources, and compatibility headaches.
Let’s explore some popular chassis the Beams get swapped into and the important considerations for each one.
Toyota Altezza/Lexus IS300
The Altezza and its Lexus variant came equipped with the 3SGE Beams from the factory, so this is a direct bolt-in swap. It’s hard to beat the seamless integration you get sticking with the original configuration.
Benefits:
- No fab work needed – Engine bay designed for Beams
- Direct transplant of all accessories
- Same engine management system
- Axles, transmission, and mounts match up perfectly
Considerations:
- Won’t gain extra power over stock
- Limited to ~250 HP without forced induction
- Might be better value sourcing a used low-mileage 3SGE versus importing
The Altezza/IS300 is the perfect choice if you want to refresh your aging 3SGE with a lower mileage JDM engine. All hookups will be plug-and-play.
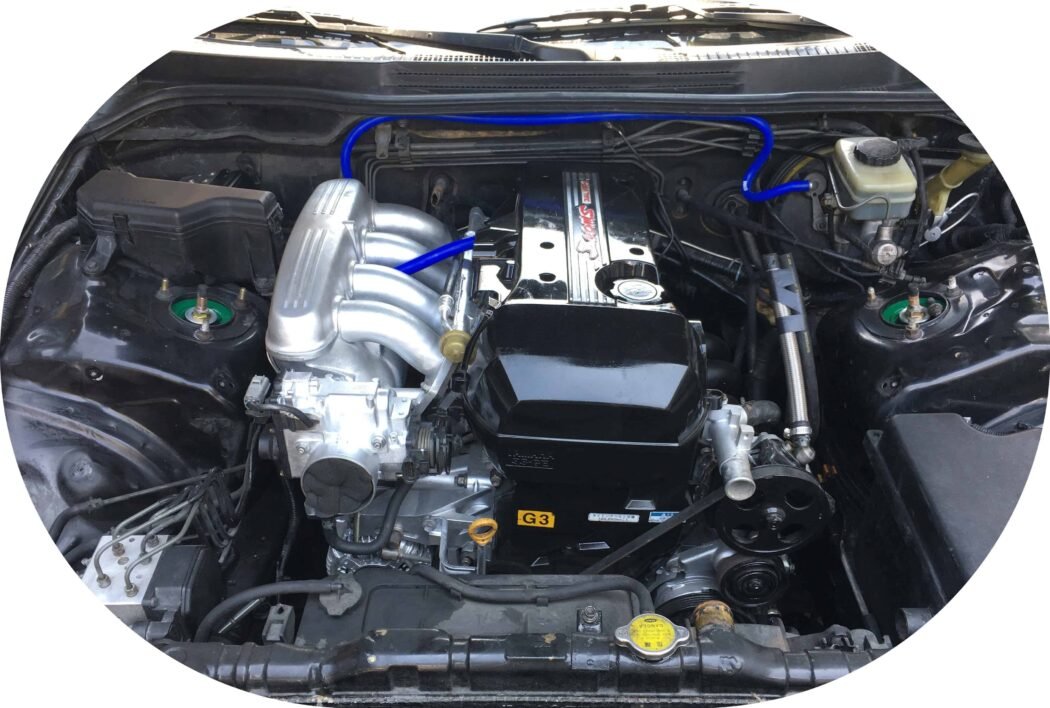
Look at this beauty… 🤩
Toyota Chaser/Mark II
The RWD Chaser and Mark II are popular models for dropping in the 3SGE Beams. With the right upgrades, they can achieve over 300HP NA.
Benefits:
- RWD powerhouse potential
- Responsiveness of the Beams’ high rev range
- Engine bay space minimizes fab work
Considerations:
- Will need custom engine mounts
- The driveshaft may require shortening
- Oil pan mods for steering rack clearance
For maximum NA horsepower, the Chaser allows the Beams to stretch its legs all the way while putting the power down effectively.
Nissan Silvia S15
With some clearancing, the Beams fit nicely into the S15 engine bay as a replacement for the SR20. It gives the chassis a new high-RPM personality.
Benefits:
- Axles directly swap over to Beams
- Lower weight than stock SR20
- Increased tuning ceiling
Considerations:
- Modifications needed for engine bay fitment
- Custom engine mounts required
- Manage heat in the engine bay
If you don’t mind some fab work, infusing Japanese classics like the S15 with the Beams results in a unique performer that combines the best of both brands.
Mazda RX-7 FD3S
The FD3S RX-7 seamlessly adapts the 3SGE Beams into its RWD drivetrain layout. The Beams’ 9,000 RPM capability pairs nicely with the RX-7’s sports car personality.
Benefits:
- Engine bay space ideal for Beams
- Custom mounts available
- Lower rotating mass than a rotary engine
Considerations:
- Custom exhaust manifold required
- Axles likely need converting to match Beams
- Provides more torque than stock 13B
As you can see, the 3SGE Beams show excellent versatility fitting into different chassis ranging from JDM classics to its native Toyota models. Properly matched to your goals, the Beams swap unlocks incredible performance potential across different vehicle setups.
Pre-requisite For A 3SGE Beams Swap
Once you’ve selected the right chassis for your 3SGE swap, it’s time to get your hands dirty… 👨🔧
Every professional tuner knows the importance of preparation and systems. Before any given swap, always make sure you have a specific system or blueprint to follow, and ensure you get all your swap parts and components ready to rock and roll.
Here we have a 2 part process:
- Gathering the necessary parts for the swap
- Removing the old engine.
Sourcing A Quality 3SGE Beams Engine
The centerpiece of your swap project is acquiring the right 3SGE Beams engine for your build.
Aim for a compression-tested, low mileage JDM import around 50-80k miles. This ensures a healthy, reliable foundation to build upon.
Make sure to get all accessories attached like the intake, coils, alternator, power steering pump, etc. This vastly simplifies wiring and eliminates hunting down individual parts. Some recommended online importers and resellers:
- JJSMotorsports
- eBay Motors
- JDM Engine Depot
Aftermarket ECU
You’ll want an aftermarket ECU like Haltech, AEM, or Motec to gain complete control over fueling and ignition timing. This allows tuning the 3SGE to match your mods and chassis.
Starter Motor
A common precaution is replacing the original starter motor with a higher torque model. This prevents grinding or slow cranking when you are firing the engine up for the first time.
Oil System
I’ll advise you to get a new oil pump, pickup, and pan to maintain ideal oil pressure. Use a higher capacity pan if adding power or swapping into a drift chassis.
Mounts
Getting some rubber engine mounts will help you isolate vibrations and position the engine right. Custom mounts are required for most swaps beyond the Altezza. Upgrade to solid mounts for race applications.
Axles
Make sure you double-check check the axle spline count and pattern are compatible with your transmission bell housing. The 3SGE Beams use longer axles than the stock 4GEs.
Once we’ve got our 3SGE swap unit ready to go, it’s time to remove the old engine.
Removing The Old Engine
- Begin by disconnecting the battery cables to ensure safety during the removal process.
- Drain all fluids: Drain the coolant from the radiator and engine block using a drain pan. It’s important you dispose of it carefully, according to local regulations in your country
- Label and disconnect: Remove any components and wiring connected to the engine such as the exhaust manifold, intake manifold, and power steering pump. Label each component for easy reinstallation later.
- Disconnect all electrical connections including those for sensors, ignition coils, and fuel injectors.
- Loosen and remove all bolts securing the transmission bell housing to separate it from the engine block.
- Support engine with jack: Always support both sides of your vehicle with jack stands before removing any mounting bolts or brackets connecting the old engine to its mounts or subframe.
- Lift out the old engine slowly using an overhead hoist or a lifting device capable of handling its weight safely.
With the old engine extracted, you can now begin test-fitting the new Beams. This will help identify any remaining clearance issues or mounting considerations.
For any quality swap project, PREPARATION IS KEY!
Taking the right preparatory steps ensures you have all the necessary hardware ready before tackling the technical process of shoehorning your 3SGE Beams into the engine bay.
It saves you a lot of time, resources, and potential mishaps. So make sure your preparation is done right. 👨🔧
Installing the 3SGE Beams Engine into Your Vehicle
At this point, you have your shiny new JDM 3SGE Beams engine and all the supporting parts.
Now comes the fun (and challenging) process of fitting it into the engine bay and integrating it into your chassis, for that dream build.
Let’s walk through the installation process step-by-step.
Preparing the 3SGE Beams For Installation
To ensure a smooth install process, It’s important you take time to properly prepare your new engine before fitting it into the car:
- Inspect and Clean: Begin by inspecting all fluids and servicing as needed. This includes coolant, oil, transmission, brake fluid, and power steering.
- Replace Gaskets and Seals: Verify all engine seals and gaskets are in good shape. Replace anything leaking or cracked – it’s much easier now versus with the engine installed.
- Check Timing Components: Verify that all timing components such as belts or chains are in good condition and properly aligned with crankshaft and camshafts for optimal performance. Double-check that all engine accessories function properly, like the alternator, AC compressor, and power steering.
- Test that ignition coils, injectors, and wiring are connected and working.
- Rotate the crank pulley by hand to build oil pressure and verify smooth operation.
With everything verified externally, it’s time to lower your new Beams into the waiting engine bay.
Mounting the Beams
Having the right mounting strategy in place is critical for a smooth install:
- Use a quality engine hoist with attachment hooks to carefully lower the engine. Watch for any snags.
- Position your engine mounts based on the test fitting you did earlier. This may require you to make some adjustments to get the proper alignment.
- Torque all mounting bolts to OEM spec starting from the middle outwards in a crisscross pattern.
- Ensure there is adequate clearance around accessories like starter, oil filter housing, etc…
- Check for excessive engine movement indicating worn or improper mounts.
- Securely attach transmission and gearbox mounts as well. Stabilize with torque damper or crossmember.
Integrating Engine Systems
Once you’ve had your Beams properly mounted, it’s time to integrate these supporting systems:
- Attach custom exhaust manifold and piping. Ensure proper clearance around the turbo if boosting the engine.
- Adapt your oil pan, pickup, and breather fittings based on chassis.
- Wire up the trigger wheel, cam angle sensor, and crank position sensor to ECU.
- Connect intake piping and verify the unobstructed path to the throttle body. Install air filters in isolated areas.
- Install an upgraded intercooler kit if the engine is turbo/supercharged.
- Connect all engine harness plugs for injectors, coils, and sensors to ECU wires.
- Wire auxiliary gauges to monitor vitals like oil pressure, water temp, intake air temp. All these are critical for the initial start-up.
First Start and Tuning Your New Install
With your 3SGE Beams engine mounted, and integrated, let’s get to the fun part and fire up that bad boy…

- Prime fuel system and check for leaks throughout fuel lines and injectors.
- Verify neutral gear selection and chassis is safely blocked/lifted.
- Turn ignition without cranking to check for any wiring faults.
- Program ECU base map calibrated close to expected parameters.
- Crank the engine briefly (<10 seconds). Listen for oddities before proceeding.
- Allow the engine to warm up monitoring all sensors/gauges. Check for leaks.
- Upload street tune to ECU optimized for your specific setup. Clear fuel trims.
- Gradually drive the vehicle while data logging, and monitoring engine vitals.
- Adjust timing, fueling, and boost via ECU maps based on tuning feedback.
- Perform multiple tuning revisions until power goals are hit.
With some care during installation and proper ECU calibration, your 3SGE Beams swap will be firing on all cylinders in no time. 🤩
Tuning and Troubleshooting For Optimal 3SGE Beams Performance
Once your 3SGE is mounted and running in your chassis, the fun really begins – dialing in power gains through careful tuning and sorting any bugs that crop up. What a feeling… 😀
Here are some key tips for unlocking optimal performance from your swap.
Tuning for Maximum Power
The 3SGE motor responds extremely well to ECU tuning optimization:
- Start with baseline fuel, ignition, and boost maps calibrated specifically for your engine and mods.
- Log air/fuel ratios across the RPM band. Target between 12:1-13:1 for maximum power.
- Optimize the ignition timing curve to allow maximum advance without detonation.
- Increase turbo boost pressure gradually while monitoring engine vitals to avoid damage.
- Verify excellent intercooler efficiency through logs – aim for intake temps under 110°F.
- Adjust variable cam timing for increased intake duration in the upper RPM range.
- Upgrade ECU to better handle 500+ HP if pushing for extreme power levels.
Proper tuning unlocks massive power gains from your Beams. Take it slow initially and don’t get greedy with aggressive timing or boost numbers.
Troubleshooting Common Issues
While the Beams architecture is as solid as it gets, there are some potential gremlins, and hiccups you might face along the way. It’s all part of the performance tuning process and you should learn to take them in stride and find solutions.
Some common issues for the 3SGE are;
- Oil pressure too low – Upgrade oil pump springs, check bearings, and increase idle speed.
- Overheating – Improve the cooling system, reduce ignition timing, and lower boost levels.
- Misfires – Inspect coils, plugs, injectors, and compression. Check fuel/ignition maps.
- Oil consumption – Worn piston rings likely. Perform leakdown test. Rebuild may be needed.
- Vibrations – Correct engine mounts, check crank/driveshaft balancing and inspect couplings.
With thoughtful tuning changes and diligent troubleshooting, your swapped Beams will deliver incredible high-RPM power. Just take things slowly, monitor engine vitals, and adjust as needed.
Now you know exactly what it takes for you to swap that 3SGE Beams engine, and build your dream project car!
Ready to take on that 3SGE Beams swap project? Browse our selection of quality, low-mileage, Japanese imported, JDM 3SGE Beams engine for sale!